Followers

Wednesday, 30 September 2015

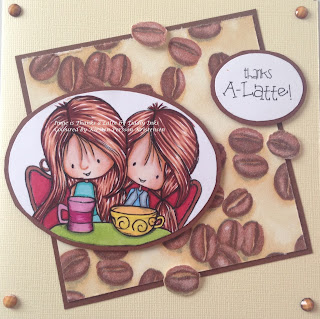
Thanks a latte

Hi there,!

I just saw a challenge over at the Tiddly Inks Challenge blog and thought it would be fun to participate in it. Haven't participated in their challenges before, but I do have a lot of their images, and have a few projects not shown anywhere yet, so why not?

For this project I've used the "Thanks a latte" digi stamp, which is adorable, and could quite honestly just as well be me and one of my sisters having a coffee together.


Making this project turned out to be a bit of a challenge, as the table cloth and I did not exactly agree to where the pleats should be, so I ended up cutting that part away. It's still a very cute project, I think.
 
The background with the coffee beans is actually a napkin. Fun story there. One day on Facebook I watched a video of a lady who was ironing napkins onto cardboard paper (plastic wrap in between) and it looked so easy. Of course I had to try. I had some suitable (and very different) napkins among which was this coffee bean napkin I got at a birthday party once.
 
Doesn't it look awesome? I cut out a few extra coffee beans and added them with glue pads for height and I had a few coffee coloured pearls for the corners as well. I love how it all turned out.
 
That's all for now.
 
Be happy crafting.
 
This project is entered into this challenge:
 

Monday, 28 September 2015

Christmas in September


Hi there!

A new challenge has seen the light of day over at the Scrapbook Stamp Society challenge blog. Anything goes – but a card. Well, being new to this design/challenge blog stuff, I made this card and when it was done, I found the theme for the challenge shouldn’t have been a card. Well, it’s still an anything goes project and now we’re celebrating Christmas in September too LOL.
 
I’ve used Sherri Ann Baldy IMG701. You can find it by clicking the image no.


I couldn’t help it, but I had to buy this image, when I saw it. Maybe because of the candy house, or maybe just because he’s so cute and adorable. Anyway, I loved colouring him and putting the card together. 

I have used the following Copic markers for the project:

Skin: E13, E11, E21, E00, E000, R20 and E04
Eyes: B28, B14 and B12
Fur on hat: 100, C7, C5, C3 and C1
Clothes: RV69, RV66. V06, V05 and V01
Peppermints: R27
Candy: Y15, YG03 and RV55
Icing: C1
House: E15 and E13
Cake figure: E18 and E15
Hedgehog slippers:                  Antlers – E18
                                                     Nose – RV10
                                                     Body – RV10, RV55, E18, E15 and E11
                                                     Soles – C5
 
I had a candy cane sticker, which I put on as embellishment together with some purple flower gems, two big felt flowers that matched the colours on his clothes and finally a SimplyBStamps sentiment.

I hope you like my project. Feel free to leave a message to let me know.

Be Happy Crafting!
 
I have entered the card in this project:
2. http://mybestiesuk.blogspot.co.uk/2015/09/my-besties-uk-challenge-anything-goes.html
3. http://artesaniasmyfavorites.blogspot.dk/2015/09/challenge-19-alles-geht-mit-my-besties.html

Thursday, 24 September 2015

Challenge project

Hi there,

Once a week I receive a newsletter with access to no less than 5 free digital images from http://opalmanor.com/. I have come to love these images, because I can merge them with other designer images and make the most wonderful (at least to me) images as my imagination unfolds itself.

Let me use this opportunity to say a big "Thank You" to Opal Manor for making these images available.

Last weekend I received another newsletter and in it was a Halloween challenge. Only black and greys colours allowed and at least one of Opal Manors images should be used.

How lucky was I? Two days before that, I'd been playing around with their images and come up with this design using not only one but three (3) of their images: A ghost, a tree and the easterwitch, which on this occasion became a Halloween witch. The moon I made in Word.

I've distressed the image very lightly with my black distress pad, giving the impression that's it's early night or a bit foggy. I'll leave that to your imagination.


I had so much fun colouring this project and putting it together.

I shredded the edge of the image (not quite sure that's the correct word for it, but I don't know any other), I put it first on black then on grey cardboard, which I also shredded.

I added some cut out trees in black and dark grey gems in the corners. I don't know either, what the dark grey lace in the background is called, but it looks very nice with the project, a bit like a cob web.

I hope you all like my project. I'm definitely going to merge more of these images in the future, when I need something special.

Be happy crafting!

Monday, 21 September 2015

Reminder card for Challenge Girl with a hat


Hi there!

This project for the Scrapbook Stamp Society challenge blog reminder challenge turned out to be a challenge for me too. I’ve used Sherri Ann Baldy’s IMG 663. You can find it by clicking the image no.

When I first saw this image, I immediately got an idea of how to use her. However, that was a big challenge because the background was not transparent, so no matter how I twisted and turned the little lake image, her background would automatically block for some of the plants, and I felt they were necessary for the whole result. Her posture simply called for a “dipping toes in water” image to me.

I had  two ladies spending their time and helping me figure this out (thanks to Karin van Eijk and Linda Williams), but in the end I found out that the Pixlr programme could erase the background (very time consuming), so now it’s done. And I’m pretty satisfied myself with how she turned out.

To me this project is all about summer, warm days and light colours. I really fell in love colouring her.
 

I have used the following Copic markers for the project:

Skin: E13, E11, E21, E00, E000, R20 and E04
Nail: R27
Hair: E43, E11 and E21
Eyes: B18, B14 and B12
Trousers and T-shirt: BG49, BG45, BG01 and BG000
Skirt layer 1: YG63, YG03, YG00 and Y000
Skirt layer 2: Y11
Flowers in hair: YR23, RV55 and RV10
Water: B18, B14 and B12
Rock: C7, C5, C3 and C1
Plants: E18, E15, YG17 and YG03
Coots: YR14 and 100
Butterflies: E43, RV55, V04 and BV13

The coots are cut outs, which I coloured in, and so are all the butterflies. Other than that I put on home made roses in  matching colours as embellishment.
 
I hope you like my project. Feel free to leave a message to let me know.

Be Happy Crafting!
 
I will enter her into these challenges:
6. http://blogfrancaislesbesties.blogspot.ca/2015/09/defi-43-nimporte-quoi.html
7. http://mybestiesaussiechallenge.blogspot.co.uk/2015/09/challenge-9-use-punchdie.html
8. http://artesaniasmyfavorites.blogspot.de/2015/09/challenge-19-alles-geht-mit-my-besties.html                                                                                                                  

Monday, 14 September 2015

Girl with a hat


Hi there!

Here comes my next Bestie project for the Scrapbook Stamp Society challenge blog, where the subject this time is “anything goes – option “Hat”. I’ve used Sherri Ann Baldy’s IMG 699. You can find it by clicking the image no.

I really enjoyed colouring her, even though large areas to colour such as the hat are huge challenges for me. But I think I did all right. I really loved colouring the fur on her boots using the stippling technique, which will come in handy in many images.


I have used the following Copic markers for the project:

Skin: E13, E11, E21, E00, E000, R20 and E04
Hair: E18 and E15
Eyes: E18, E15 and YR23
Shirt, trousers and bow: YR18, YR14 and YR17
Apron (?):  G00, YG67, YG63 and YG03
Fur: E18, E15 and E43
Hat: G99, YG67, YG64, YG03, R27, YR18, YR14 and YR17
Boots:  E15, E43 and E13 – Soles: W7, W5 and W3
Heart: R27
Flower in boots: R27, R32 and YG63

I found some autumn like paper and used that as a background – why else would she be wearing a hat? And in order to emphasize the image, I put her on a piece of dark green cardboard.

Finally I put a big orange or light copper pearl in each corner.

I hope you like my project. Feel free to leave a message to let me know.

7.10.2015
I've just seen that this image has won me a GD spot for November 2015 at the My Besties Friendship Blog (no. 2 competition listed below)

Be Happy Crafting!
 
Competition to enter:
 

Saturday, 12 September 2015

Double Sweet Escape Bookmarks

Hi there,

About a month ago I coloured and assembled these two Sweet Escape bookmarks and had so much fun, while doing it.

The bookmark to the left is called "Taking pictures", so there I'm a tourist in Paris LOL. I do have glasses myself and used to have that long hair too, and I have a digital camera as well.

Apart from the Sweet Escape digi, I used a clear stamp of the camera, the text and the flash lights. I had an Eiffel Tower die and a few dies with film rolls too.

The second bookmark is still me LOL, because I am a bookwork (the title of the digi is "Bookworm Jess"( and always read a lot, always have and always will.

Here the books are from Tiddly Ink and the bookworms are from Blackberry Jelly (very appropriate to put more than one bookworm onto the bookmark, I thought). And all the letters are die cut. I believe I wrote the text here myself, if I'm not mistaken.

 
I also got to experiment with hair colours on these projects, which is something I'm not so good at. I should do that more often and also experiment with skin colours, but I'm not that brave yet :-).
 
Both bookmarks were entered into a challenge in the Sweet Escape FB group, but unfortunately didn't win. But never mind that, I loved making these project.
 
I hope you like my projects and if you do, please, leave a message here below for me. Any suggestions for future projects will also be appreciated.
 
Be happy crafting!


Sunday, 6 September 2015

Rose by Lena Raven

Hi there,

I want to show you a colouring I'm very proud of (I know, I'm not supposed to say it myself, but I really am, so please bear with me).

It's been a while since I coloured her, but only now I got and idea and a few moments to put her together.

I've coloured Rose by Lena Raven http://lenaraven.deviantart.com/art/Rose-210583223 and am so happy with the result, I couldn't wait to show you all.


I've kept it a CAS card, because I think the image can stand alone in it's beauty (I mean the image itself, not my colouring).

The hair was really a challenge with all those locks. I love her expression and the big eyes, which make her look quite thoughtful to me.

The only embellishments I've used are some melted Hama pearls and two home made roses.

I hope you like her as much as I do.

Be happy crafting!

Friday, 4 September 2015

Flying witch

Hi there,

Time for another post. The one I've chosen to show you today was made last Sunday and has only been shown in the Kit and Clowder Facebook group (if I remember correctly).

With our Create and Learn classes this month (15th August - 14th September) all subscribers received a free Handbook with backgrounds. The Handbook includes step by step instructions as well as a video. These lessons are so great and so detailed, that I cannot  recommend them enough to anybody, who wants to learn colouring. Hurry over to www.kitandclowder.com and sign up for them. Next issue of the Handbook is expected in November.

Well, back to my project:


The image is "Escoba" by Alicia Bel, and the sentiment is from SimplyBStamps.

I have coloured it with my copics, and had a lot of fun doing it. The background is stippled (not exactly the same kind of stippling we do in Parchment Craft, but the hand movements are the same).
I used two blue nuances and added a purple one as well for the background. It took me just as long to colour the background as it did to colour the witch with all those dots. LOL

The finished card is a simple CAS card. The only embellishments I've used are melted Hama pearls. I like these simple cards, where the embellishments don't take any attention away from the image.

That's all for now. Have a great day.

Be happy crafting!